Island Construction
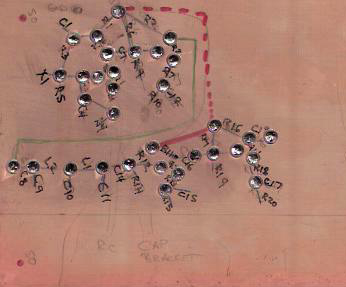
Tonight I started to layout a board for my 30m transmitter project.

I updated my schematic to include a couple more gain stages. I then grabbed a piece
of copper circuit board and started to map out where the parts were going to go. I
left room for a bracket and BNC on one edge and then on another edge I left room for
a variable cap & bracket + something to hold a 1/8" or RCA jack for the CW key.
I drew it out in pencil and then used a Sharpie marker to make the notes more readable
once I felt ok with the parts placement. I borrowed a Dremel drill press from N0FP
earlier this afternoon. I used a NJ pad cutter to make the isolated islands on the
board. (A few extra RPMs are your friend with the dremel & press so that cutter
does not try to walk or jump around. I figured this out about 12 pads into the project.)
Once the islands were cut I tinned the islands to make them easier to work with.
Since this is a learning experience I am trying to leave room incorporate changes
as I come across them. (Gain & filtering are likely additions.) I am looking forward
to morphing the breadboard into a copper board with solder connections and then hooking
it up to the test gear.
The island cutter was a lot of fun. I like this as a tool to build some quick circuits.
I think that I will need to purchase a another Dremel and a matching press when the
right opportunity comes along.
73 de NG0R
PS... Someone asked for more info on how this works
I bought the tool from:
http://www.njqrp.org/islanderpadcutter/index.html
Here is an illustration of how it works:

(illustrations shown above, and liberally used in the instruction sheets
shipped with the pad cutters, were graciously supplied by master graphic artist Paul
Harden, NA5N)
The NJQRP no longer sells these kits. (I have three of them.)
You can buy a similar version from Dan's Small Parts:
http://www.danssmallpartsandkits.net/
http://www.danscloseoutsandspecialdeals.com/Dansspecialdealsno3.html

Be aware that Dan's cutter is designed to fit into a drill press... not a Dremel.


I updated my schematic to include a couple more gain stages. I then grabbed a piece
of copper circuit board and started to map out where the parts were going to go. I
left room for a bracket and BNC on one edge and then on another edge I left room for
a variable cap & bracket + something to hold a 1/8" or RCA jack for the CW key.
I drew it out in pencil and then used a Sharpie marker to make the notes more readable
once I felt ok with the parts placement. I borrowed a Dremel drill press from N0FP
earlier this afternoon. I used a NJ pad cutter to make the isolated islands on the
board. (A few extra RPMs are your friend with the dremel & press so that cutter
does not try to walk or jump around. I figured this out about 12 pads into the project.)
Once the islands were cut I tinned the islands to make them easier to work with.
Since this is a learning experience I am trying to leave room incorporate changes
as I come across them. (Gain & filtering are likely additions.) I am looking forward
to morphing the breadboard into a copper board with solder connections and then hooking
it up to the test gear.
The island cutter was a lot of fun. I like this as a tool to build some quick circuits.
I think that I will need to purchase a another Dremel and a matching press when the
right opportunity comes along.
73 de NG0R
PS... Someone asked for more info on how this works
I bought the tool from:
http://www.njqrp.org/islanderpadcutter/index.html
Here is an illustration of how it works:

(illustrations shown above, and liberally used in the instruction sheets
shipped with the pad cutters, were graciously supplied by master graphic artist Paul
Harden, NA5N)
The NJQRP no longer sells these kits. (I have three of them.)
You can buy a similar version from Dan's Small Parts:
http://www.danssmallpartsandkits.net/
http://www.danscloseoutsandspecialdeals.com/Dansspecialdealsno3.html

Be aware that Dan's cutter is designed to fit into a drill press... not a Dremel.
