I recently bought a spectrum analyzer and have been nervous about over driving the input to the scope. I also bought a step attenuator which will help control the levels but I still did not feel that I had this dialed in. I decided that I needed a directional coupler. Of course anyone could go buy one from MiniCircuits or eBay but what fun would that be. Most of the units on eBay were for microwave bands and up. Most of the units from MiniCircuits were rated for very low power... something like 2 watts in.
I wondered what it might take to build one... it is a geek/knack victim approach to
solving this challenge.
Some good reading on the topic:
http://michaelgellis.tripod.com/direct.htmlhttp://www.elecraft.com/manual/CP1%20Manual%20Rev%20A.pdfGQRP/SPRAT article by
David
Stockton - G4ZNQMechanically they look pretty simple... electrically I am not 100% certain how we
are figuring out forward power from reverse power. Is it the difference in phase on
each side of the toroid or some other evil EE magic?
I found a
calculator
on the internet that I could download and use to model coupling vs. the number
of turns. This calculator matches the data in the Sprat article and the info from
the Elecraft website fairly closely. The schematic below shows what I ended building.

Looking at the schematic we have two toroids, three BNC chassis mount connectors,
and two 100ohm 1w non-inductive resistors. (I found the resistors on the Digikey website...
I was looking for Carbon Comp and found these.) So that parts are not too magical.
Looking at the pine board picture (below) you will notice that I am using scrap aluminum
angle stock to hold the BNC connectors in place. The blue wires are some scrap 14
gauge hookup wire. The white and brown wires are some scrap wire roughly the same
gauge as Cat5 cable pairs... this is actually from a large phone bundle that I bought
at a Hamfest. The toroids are T50-43 that I had on hand that I bought a while
back from
W8DIZ. The resistors
are the Digikey find.
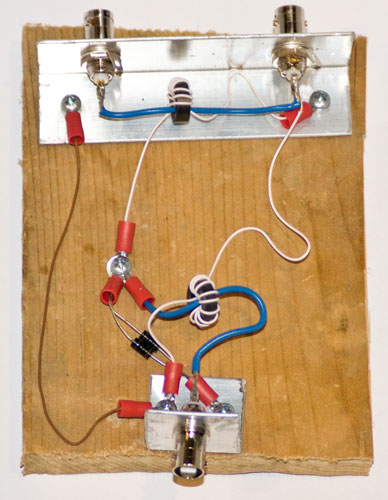
So... this looks like a Rube Goldberg kind of construction. Initially I figured that
I would build it on a pine board, test it, modify it, and then eventually build the
final item. Once I finally got around to the construction it only took about an hour
to cut, drill, wind, and wire-up everything. (The lugs are all soldered together...
no crimps.)
My initial test showed that it was about 20db down from 1.7mhz to 150mhz but that
was the limit of my signal generation at my QTH. I then went over to N0FP's QTH as
he owns a nice Wavetek signal generator that is good to 1ghz. We measured his signal
generator from 1mhz to 1ghz in 50mhz increments and then remeasured the same range
with the coupler inserted. This would allow us to calculate (approximately) how the
coupler performed over a wide frequency range

The coupler was generally 20db down... with a couple of blips at/near 30db down. (I
think that we might have an data error at 550mhz... but we are not sure and it is
not really an issue either way.) The coupler performs very well at HF-VHF. In fact
it is usable all the way to 1ghz.
I am going to build a final version of this coupler into a small Hammond box. As part
of that effort I will also minimize the wire lead lengths. Once that is done I plan
to visit N0FP and test the final product.
I am extremely happy with this experiment and plan to make the final version of this
(in the box) part of my permanent test gear for my spectrum analyzer along with my
step attenuator.
73 de NG0R


